


How to set up a business card using InDesign
 For the purpose of this tutorial, I will be setting up this business card for print using Adobe InDesign. The artwork has been created in a separate program and will be imported in. While InDesign is great for page set up, creating original artwork is best left to vector drawing programs like Illustrator.
Step 1: Open a new InDesign document
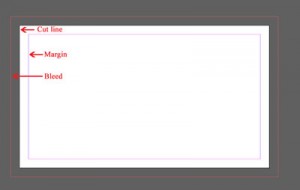
Document Size: 3.5 x 2 (this is the size of a standard business card)
Margins: Set each margin at .125. This is basically going to be your safety area. The closest you should put text and any other graphics you do not want to be cut off is .25 away from the cut line (the actual size of the business card). Tip: The farther the text is from the edge, the safer you are and if there should be any error in cutting or printing, it will be harder to notice.
Bleed: Any project that has graphics extending to the edge needs a .25′ bleed on each side. Without a bleed, your card could end up with a white line around the sides. Set each of these boxes to .125.
Hit “Ok” and then your document should look like this:
Step 2: Place your artwork
Go to File-Place and locate your image and click open.
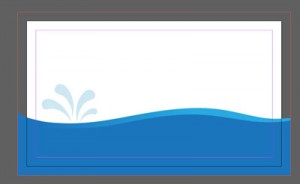
Now click anywhere on your document. InDesign places your file into the document and keeps the actual size of the image. If you need to resize the image, click your direct selection tool. This is found on your toolbar to the left and is the white cursor symbol. You can also hit “A” on the keyboard. Just click your image to get the resize handles then drag it to the size you want it. Remember, if this image is supposed to bleed make sure that it extends to the edges:
Note: If your images are appearing blurry in InDesign but you know they’re high resolution, check your display performance. You can do this easily by right clicking on the image-Display Performance-High Quality. If the program starts to lag, simply go back to a lower setting. This has no effect on the final outcome of your document.
Step 3: Add text
Photoshop is great for creating graphics but nothing beats InDesign”s vector based text.
The text tool is the “T” icon on the left hand side toolbar. You can either click the icon or hit “T” on your keyboard.
When the text tool is selected, a toolbar appears at the top where you can change font sizes, styles and align text.
Tip: If you know what font you want to use and you don’t want to keep selecting it each time you type, set it now before you draw a box or select any text. Once you select a font, click the selector tool then go back to the type tool. This will tell InDesign this is the font you want to work with.
Enter text by selecting the text tool then left-clicking on your document and dragging your cursor. This makes a text box you can type in.
To move your text around or resize the text box, click on the black cursor on the left hand side toolbar. This will allow you to select the text box so that you can move it and/or resize it. If you see a box with an “x” on your text frame, this means you have hidden text and you need to resize the textbox.
Tip: Alt+Ctrl+C will resize the text box for you, assuming that no text is hidden.
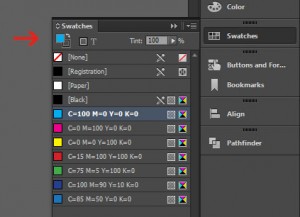
To change the color, select your text and click on the swatch panel to the right. If it isn’t there, go to Window-Color-Swatches.
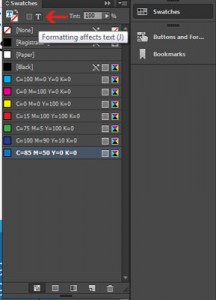
In the swatches panel, there is a “T” icon. Click that then choose your color. To choose a color not on that list, you can use the eyedropper to pick up any colors in your document or click the drop down menu in the corner of the swatches panel and choose “New Color Swatch”. A new color swatch is only helpful if you know the percentages of the color you’re wanting to use or the pantone number.
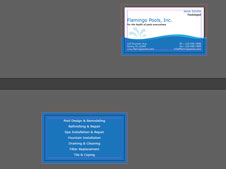
 As you can see, I’ve created a simple business card for a made-up pool company.
Step 4: Adding a back side (optional)
Say you’ve gotten this far and have decided that a two sided business card is what you really need. This could be great for listing products, services, or even a map of your location. Any of these things will help your customers become more familiar with your company.
To set up a second side, go to the right hand panel and click Pages. A panel pops up and at the bottom of that panel click the “new page” button. You should now have two pages. You can switch between pages by clicking on the page in the pages panel or by scrolling up and down.
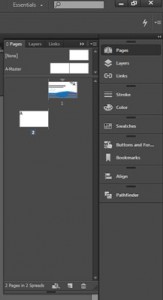
It’s a great way to work on both the front and the back at the same time.
Step 5: Additional design elements
I’m still working on the backside of this card but if you’re doing your own design, you can follow along for a look into a few more InDesign tools.
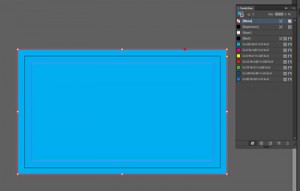
To fill the background with a color, select the rectangle tool from the tools panel on the left or hit “M” on your keyboard. Click anywhere on the document and a dialog box pops up. Enter Width: 3.75 and Height 2.25 so that our background will bleed to every edge. Hit “Ok”.
You should now have a box that goes around your entire second page. But it probably isn”t centered. To fix this, look at your tools panel at the top of the program. You will see alignment tools. Or go to Windows-Object & Layout-Align. This pulls up the alignment tools. By clicking the “Align Vertical Centers” then the “Align Horizontal Centers”, your rectangle will move into place.
To change the color, select your rectangle and click on the swatches panel again. Choose the color you want.
You see the icon that has the solid box and then a frame behind it? If your background has a border around it, you might want to remove it. To change the stroke, click on the stroke so that it moves in front of the fill. Choose “None” for the stroke.
You’re now ready to begin designing the back of your business card.
For this, I used the text tool to list services a pool company may offer to their clients.
Step 5: Saving your document
Go to File-Export and choose PDF print. Select “High Quality print” from the drop down menu at the top. On the right, click “Marks and Bleeds” and make sure the check box is clicked for “Use Document Bleed Settings”. Save your file!
You can also choose to package your project and send a folder with font styles and list of inks used to your printer. To do this, go to File-Package. InDesign generates an inventory dialog box that notifies you of any problems with your file. If there are font issues, fix those before continuing.
The next dialog box is for printing instructions. If you have any special printing instructions, you can make notes here. Otherwise, just continue.
When you go to save, you will see a series of check boxes.
Copy Fonts: If you have used a special font, you will want to make sure InDesign copies this font into the folder it is creating for your project.
Copy Linked Graphics: If you’re sending the InDesign file, you will need to also send the graphics.
Update Graphic Links in Package: If this isn’t clicked then the images might appear broken when the printer opens the file.
Include Hidden Fonts and Links: If you’ve hidden some items in your layers, by leaving this unchecked, those items will not be copied into the new document. If the printer will not need these hidden items, uncheck this box as it will be helpful in reducing the size of your file.
View Report: Will allow you to edit the instructions and view your report again upon saving. This is optional.
Click save and InDesign will create a folder for you to send to your printer!
Tags: Business Card, InDesign, TutorialCategorised in: Tutorials
This post was written by Progressive Printing Team