


Designing a Purchase Order form in Microsoft Word
 For companies looking to create their own business forms, Microsoft Office is an invaluable resource. The Microsoft library offers a variety of pre-made forms that can be used as a base to create invoices that fit your business. These tweaks are easy to do and this tutorial will offer tips on how to quickly make edits to Microsoft’s Purchase Order Invoices.
1. Open Microsoft Word
Under New Document, type in “Purchase Order”.
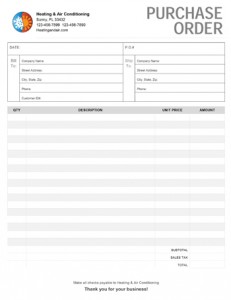
You will see many templates pop up. Scroll through and find one that has a layout that is functional and applies to your business. If there isn’t a perfect fit, choose one with the most useful layout. I’m going to pick this work order form because it gives me the most room for lines.
To select a template, double click on the icon. Word will open a new document with a ready-to-edit template.

2. Page Size
Click on the PAGE LAYOUT tab at the top. Click the Size icon and make sure your page is the desired size. This template is a full page.
Next click the Margins icon and select the .25 margins. If your Microsoft does not have this option then click Custom Margins at the bottom. Put .25 for Top, Left, Bottom and Right and click OK. This gives us more space to play with.
3. Gridlines
I know when I opened this template, I could not see the layout tables that all of the information is sitting in. The layout tables are not printable and aren’t shown when someone is filling out the form. If yours are visible, that’s fine. They’re helpful when trying to find where things are at. If they aren’t and you would like to see them, click on the DESIGN tab at the top. At the far right, there is an icon that says Borders. Under that, you will find View Gridlines. When that is selected, you will be able to see the form layout.

3. Place Your Logo
To place your company logo, click the “Your logo here” box and go to Insert>Picture. Find your logo on your computer and click Insert. Word will replace the text box with your company image. If your image is too large, use the transform tools to make it bigger or smaller (the transform tools are the little circles on the frame around your image when you have it selected). You can also drag the logo to any position you want inside the cell.
![]()
4. Slogan
This template gives us the option of entering a company slogan. You can choose to do so now or remove the words all together. Since I do not have a company slogan, I’m going to remove the text. To do that, simply click the text and hit the delete key on your keyboard.
5. Form Title
I needed a purchase order form and this one says work order. I’m going to highlight the word “work” and type in “purchase”. Word has now bumped the title to two lines. To get it to one line, change the font size by selecting the text. A pop up menu will appear and you can quickly select the font and size. Or while in the HOME tab, the font tool bar will be at the top left of the screen.
I’m going to leave it this way because I like the way it looks and I think I will move my company name and information up next to my logo since I chose not to type in a slogan.
6. Company Information
I’m going to go ahead and type in a company name and information that I’ve made up. To do this, I’m just going to click the line I want to edit and then begin typing.
Optional: I’m going to move this up next to the logo. Highlight the information and copy it to your clip board (ctrl+c) then delete the information. Put your selector into the cell next to your logo and paste the company information in (ctrl+v).
The company information ends up at the top of the cell. To fix that, right click in the cell and choose Table Properties. Choose your desired alignment and hit OK.

OPTIONAL: If you chose to leave out a slogan and if you’re keeping your company information where the template has it but you would like to have the Purchase Order on one line you can do that by selecting both of the cells:

Right click and choose Merge Cells. Your form should now look like this:

7. Fixing the Date and WO#
Since I moved the company address up next to the logo, I’ve freed up some pace on my form. Since the Date and WO# looks a little squished and will make writing difficult, I’m going to move them around.
Select the Date and delete, moving the WO# to the first line. I changed WO# to PO# and moved it away from the right margin so that I can later write in a number beside it. Then place your cursor in the other cell and type in “Date:“. These boxes are a little bigger than I need now so I’m going to click on the line dividing the upper cell from the lower and drag it upward.

The DATE and the PO# are in different fonts. To quickly fix this, highlight the P.O# and from the HOME tab choose Format Painter on the top left. With that, select the “Date:” and Word will automatically change the text formatting to match that of the “P.O.#”
8. Bill to and Ship to
Change “To” and “Job” to “Bill to” and “Ship to“. They’ll probably end up on two lines unless you make the font smaller or make the cell bigger. I dont mind the way they look on two lines so I’m going to leave them.
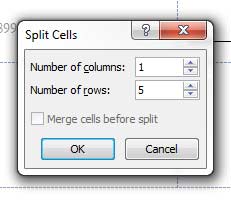
The customer information has already been supplied but if I’m having these forms printed, I wont be able to write in these boxes like they are. So I’m going to delete all of the text out of that cell.
Right click in the cell and select Split Cells. Choose 5 rows and click OK.
Do the same for “Ship to“.
The “Ship to” section is a tad too small so readjust those cells by clicking on the vertical lines and dragging them toward the “Bill to” section.

Now the lines we see here wont stay so in order to have lines to write on, we’re going to have to paint them in. Right click on the table and choose Border Styles. Select the first option. Your cursor will change to a little paint brush. Now you can paint along the dotted lines.

Start in the upper left hand corner and drag your cursor all the way to the right. This will turn a dotted line into a solid one. Continue to paint along the dotted lines that you want to fill in.
9. Font Size, Color and Style
Garamond really isn’t the best choice for printed forms. San-serif fonts tend to print clearer and are easier to read. Also, this form is using light gray text that is hard on the eyes. I’m going to select some of my text now and change some text formatting. Again, this can be done from the little pop up or up at the toolbar at the top.

10. Terms and Conditions
At the bottom where it says “Make all checks payable …” is where you can insert your own terms and conditions. We jumped around a little but it is best to get your terms written in so you can determine how much room you have left over.
11. Products
Now lets jump back to our table.
The “QTY” column doesn’t need to be that big so in order to make more room for “Description“, I’m going to drag that vertical line to the left. Word keeps the column titles in the center which is convenient and easy. Change any of the text at the top by selecting the word and typing in what you need. I’m going to change “Line Total” to “Amount.”
The reason I chose this template in the first place was because it looked like the simplest theme that would give me lots of room for more product lines. Since I do have room to spare, I’m going to add a few more lines to this table.
Right click on any row and go to Insert-Row Above (or below, doesn’t matter). Repeat until the terms and conditions reach the bottom of the page. I squeezed in four more product lines but depending on your terms and conditions, you may have less room.
My new lines are all white opposed to the gray-white-gray pattern above. To fix this, I’m going to select the row using my cursor. The font formatting box should pop up. Inside the box is a little paint can. That’s the shading tool. Click on the Shading Tool and choose the lightest gray. This little icon can also be found at the top of the page under the HOME tab.

Now that we’ve added more rows, our columns are too short. I’m not sure what style the template used but that’s OK because Word gives us an eyedropper that makes formatting easy. Right click and choose Border Styles again but this time select the Border Sampler option. Click on one of the column lines. Word has copied the formatting you want to use. Now just fill in the columns where you see dotted lines (like you did above) and along the new rows.
12. Save as
The form is finished. To save your Purchase Order into a printable format, choose FILE from the tabs at the top. On the right hand side, choose Save As Adobe PDF.
Now that you have created your very own business form using Microsoft Word, you can print the purchase order yourself to use or you can have Printit4Less.com do the printing for you! We offer custom form printing that allows you to upload your own design for us to print into 2, 3 or 4 part sets.
Tags: business purchase order, custom purchase order, designing a purchase order, Microsoft Word, Purchase Order, purchase order form, purchase order template, TutorialCategorised in: Tutorials
This post was written by Progressive Printing Team