


Custom Design a #9 Reply Envelope with Microsoft Word
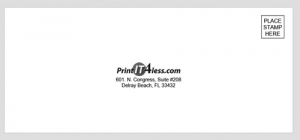
 Reply envelopes are pre-printed with your company address, a place for a stamp and three lines for your client’s return address. These envelopes are a marketing strategy used when expecting return mail. This return mail can be anything from donations, payment, feedback and signed forms.
Creating the artwork for your own reply envelopes gives you the artistic freedom over fonts and logo arrangement. It’s a simple product to design so why not take the time and make sure that this small piece of marketing material stays true to your brand image? No one knows your brand image better than you, after all!
1) Open Microsoft Word
2) Set Up Document
Under Layout – Size – Choose More Paper Sizes
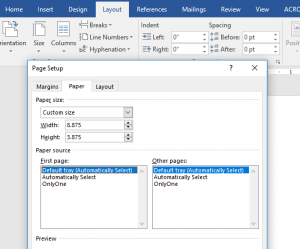
From here set the width to 8.875 and the height to 3.875
On the Margin tab, set the top, bottom, left and right margins to .25”.
Click “OK”.
3) Insert Logo (optional)
If you have a logo, you can insert it onto the envelope by going to Insert – Pictures – browse to your logo on your computer. When you find it, click Insert.
Click on the logo and go to the Format tab.
Find the Align button. Choose Align Center and Align Middle to place the logo in the exact center of the envelope.
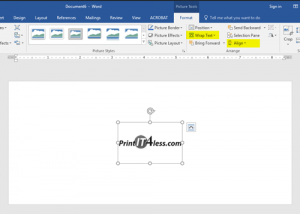
Tip: If the logo is stuck at the corner of the document check the text wrap. From the “Format” tab, find “Wrap Text” and choose “Behind Text”.
4) Insert Company Information
Go to Insert – Text Box – Simple Text Box
Once the box is inserted, you should now be on the Format tab with the option to stylize the box. Select the Shape Fill and Shape Outline and set it to none.
Type your company name (if you didn’t use a logo) and address into the box.
Style the text by either highlighting it and waiting for the font options to pop up or simply right click and choose Font.
Choose a font that best compliments your logo. Our logo uses Arial so that is what I have chosen for the company address. The minimum font size you should use is about 10pts. Follow the alignment instructions in Step 3 to align the text box in the center of the document.
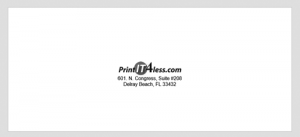
Tip: The bottom of the envelope needs to have enough clearance so that the post office can stamp it. So while you can play with the size and style of your company address, it’s best to keep your imprint 1.5 inches away from the bottom.
5) Place Stamp Here
The “place stamp here” box reminds clients they will need to place a stamp on the envelope if they wish the envelope to reach its destination. Or a way to make sure your clients don’t try to stick you with the postage bill!
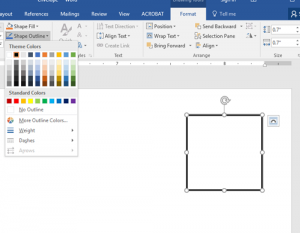
Go to Insert – Shape – Rectangles and just draw a box.
Ideally this box needs to be between .5”x.5” to 1.5”x1.5” and the text inside must be readable. Click on the box you just made and the Format tab should open. At the top right you will see a place to put in the width and height. I chose .9”x.7”.
Click on Align and choose the Align to Margin option. This way we can align it perfectly to our .25” margins by choosing Align Top and Alight Right.
You probably have a blue box still so from the Format tab choose Shape Fill – None and under Shape Outline choose a thin black line.
Insert another text box but this time type in “Place Stamp Here”. I’ve used Arial-12-All Caps to stylize the text here. Highlight the text and right click and choose Paragraph center the text.
6) Return Address Lines (optional)
Your envelope is now complete and ready to be sent off to the printer. However, there’s some advantages to adding return address lines.
- It reminds the client to write their return address on the envelope.
- It helps the client write legibly.
To place a line, go to Insert – Shapes – Choose Line. Hold the “shift” key and then drag your cursor to the desired line length. You will get a perfectly straight line. If you want to play with the length, you can click on the line, go to the Format panel, and you can input a specific line width in the width box at the top right. I’ve made mine 2”.
From the Format panel, you can change the color and style of the line. Make sure it is selected and under the Shape Outline choose black.
Once you have one line formatted, you can copy and paste two more lines into your document.
To get these spaced out just right, I find it easier to use the grid line view. Under Align choose View Grid Lines and your document will now look like a piece of graph paper.
Place the first line you drew on the second line of the grid. You can do this by either dragging it, or once you click on it you should be able to use your arrow keys to snap it into place.
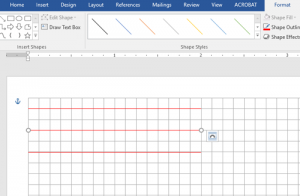
I’ve made my lines red so that you could see them better in this grid line view. Once you’re done, uncheck the grid line view.
7) Save Your Document.
It is best to save your document as a pdf to send to your printer to make sure that your fonts do not change.
When placing an order for our #9 Reply Envelopes, simply attach your designed file where it says “upload logo”.
Tags: Envelope, TutorialCategorised in: Tutorials
This post was written by Progressive Printing Team