


Creating a 9×12 Envelope in Word
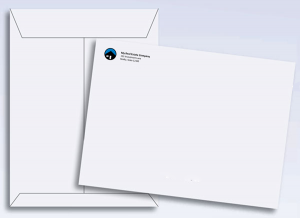
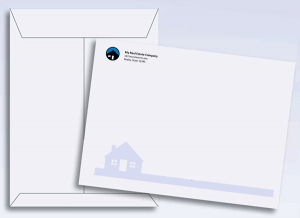 This tutorial shows you step by step how to create a unique design for a 9×12 envelope. These envelopes are typically printed with just the customer’s logo and address on the top left corner. However, these large envelopes have a ton of space that can be utilized to create a stunning first impression.
1. Open Microsoft Word
I will be using Microsoft Word 2013 to create this one of kind custom 9×12 envelope.
2. Page Layout

There is a button that says Size where Word gives you a list of page size options. Unfortunately, there isn’t anything here to help us. Your version of word may have “Custom size” or “More Paper Sizes” at the bottom of the list. Choose this option so that we can create a custom layout.
Under the Paper tab, set the page size to:
Width: 12
Height: 9
Margins:
Each printer has it’s own specifications when it comes to margins. Here we need .25 on each side to print. So I’m going to set each margin to .25, ignoring the gutter.
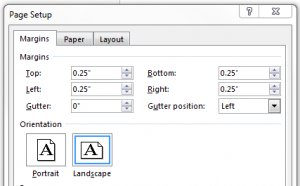
Make sure the landscape option is clicked.
Step 3. Insert Logo
Click on the INSERT tab at the top of your Word program.
There is a button for Pictures. Click that and then browse through the folders on your computer to locate your picture. Once you’ve found, hit the Insert or OK button.
Your logo should now be in the upper left hand corner of your page.
There will be a small box around the logo that will allow you to resize, reposition and move it to where you want it.
Step 4. Insert Text Box
Now we want to type the company name and address next to the logo.
In the Insert tab there is a text box button. Click that and choose the simple text box option. Type your company name and information into the box.
You can resize the box by grabbing the handles and dragging them to the desired size.
Step 5. Formatting Text Box
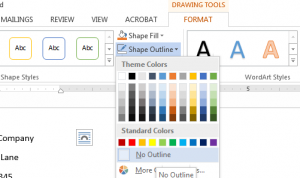
Your text box might have appeared with a line around it. To get rid of that, click on the text box (you may have to double click the bounding box and not the text) and look at the top where the text box toolbar has appeared. You should have a new tab that says FORMAT.
There is a button labeled Shape Outline. Click that and select No Outline.
Step 6. Formatting Text
To change the way your text is displayed, click inside the text box and select the text you wish to modify. Changing the text font, size and style is easy to do from the HOME tab.
If you wish to change the line spacing, select all of the text – right click – choose Paragraph from the drop down menu.
There is an option for Spacing. I’ve played with the settings here to get the line spacing that I want.
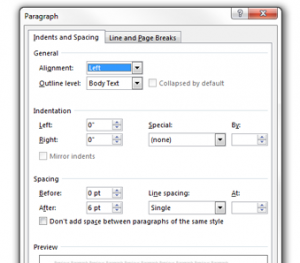
I actually ended up changing the After: 6 to 0. But you can set these to whatever looks best with your logo.
Step 7. Design choices
You could stop here with just your logo and company name at the top right corner.
Or we can continue on to further dress up the envelope and add more interest to it.
First decide what kind of design you would like to add.
The whole left side is a large space that can be utilized for interesting, eye catching designs, that will either familiarize your customers with your brand or tell them a little bit more about what is inside.
Keep in mind that we can’t use the right hand side of the envelope. Just right of the middle line is where the address will be placed and where the post office expects it to be for scanning. The upper right is where the stamp goes while the post office’s bar code will likely be placed in the bottom right hand corner.
You can put a design across the entire the envelope if you want, just keep in mind that a bar code may be placed over the bottom right section.
Below are a few ideas to get you started on a unique envelope design of your own.
Option 1: Add a second image
Following Step 3, insert another image that is relevant to your company.
Drag it anywhere you want to place it on the envelope. Consider adding more verbiage to help your customers know more a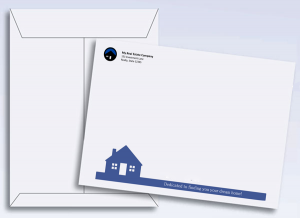 bout you or the contents of the envelope.
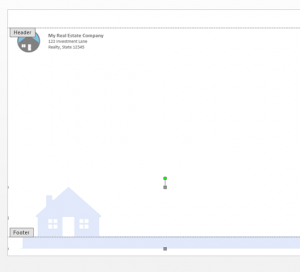
If you want to add text over your image, select INSERT and click the text box option again. Choose the FORMAT tab and make sure the Fill and Outline settings are set to none. Once you have your text typed into the box, hover your cursor over it and a Layout Option icon should appear. If you click that, and choose in front of text, you will be able to put your new text box over an image. If it doesn’t appear, you should be able to select your text and click the FORMAT tab. There is a Wrap Text button that will let you further format the
appearance of your text.
Option 2: Watermark
Watermarks are a great because they dress up a boring white envelope but are subtle to enough that if something should be placed over them it wont be as obvious.
Place your cursor after the text box and hit enter until you get to the bottom of the page.
Your version of Word may be different than mine but to find the Watermark image in Microsoft Word 2013 click on the DESIGN tab and at the far right there will be button for Watermark. Press that and go to the bottom where it says Custom Watermark.
The watermark will appear in the middle of the page. Depending on what version of word you have, you may be able to click on it and move it to where you want to. To move a watermark in Microsoft Word 2013, go to the INSERT tab and click the Header or Footer button and select “Edit Watermark“.
With that selected, you will see a preview for where the footer and header is but you will also be able to move your watermark.
Drag your watermark to the desired location.
Once your envelope is designed, you are ready to place an order for your own large envelopes.
Tags: Envelope, Microsoft Excel, TutorialCategorised in: Tutorials
This post was written by Progressive Printing Team